Black Ice Battle (Donkey Kong Country 2: Diddy's Kong Quest): Difference between revisions
mNo edit summary |
(dk wiki) |
||
| Line 2: | Line 2: | ||
{{levelbox | {{levelbox | ||
|title=Black Ice Battle | |title=Black Ice Battle | ||
|image=[[File:Black Ice Battle DKC2.png | |image=[[File:Black Ice Battle DKC2.png]] | ||
|code=8 - 2 | |code=8 - 2 | ||
|world=[[Lost World (Donkey Kong Country 2: Diddy's Kong Quest)|Lost World]] | |world=[[Lost World (Donkey Kong Country 2: Diddy's Kong Quest)|Lost World]] | ||
| Line 10: | Line 10: | ||
|after=[[Klobber Karnage (Donkey Kong Country 2: Diddy's Kong Quest)|>>]] | |after=[[Klobber Karnage (Donkey Kong Country 2: Diddy's Kong Quest)|>>]] | ||
}} | }} | ||
'''Black Ice Battle''' is the second level of the [[Lost World (Donkey Kong Country 2: Diddy's Kong Quest)|Lost World]] in ''[[Donkey Kong Country 2: Diddy's Kong Quest]]''. It can be accessed via [[Klubba's Kiosk]] | '''Black Ice Battle''' is the second level of the [[Lost World (Donkey Kong Country 2: Diddy's Kong Quest)|Lost World]] in ''[[Donkey Kong Country 2: Diddy's Kong Quest]]''. It can be accessed via the [[Klubba's Kiosk]] of [[Krem Quay]]. | ||
In | == Summary == | ||
In the level, [[Diddy Kong]] and [[Dixie Kong]] must descend down an icy cavern, and the ground slippery and made of ice. Due to the icy floor, the [[Kong]]s have limited traction, so the player must carefully move them around the area. In the level, the Kongs often have to jump between icy slopes or jump onto the next platform below them. There are many [[Zinger]]s in the level, most of whom appear within the gaps or around them. Other enemies include [[Klampon]]s, [[Klobber]]s, [[Krook]]s, [[Flitter]]s, [[Neek]]s, and [[Spiny (Donkey Kong Country 2: Diddy's Kong Quest)|Spinies]]. | |||
In the [[Game Boy Advance]] version | In the [[Game Boy Advance]] version, the level has a light green background. | ||
== | ==Layout== | ||
[[File:Black Ice Battle DKC2 GBA.png|thumb|left| | [[File:Black Ice Battle DKC2 GBA.png|thumb|left|Diddy and Dixie travel through the level in the Game Boy Advance version]] | ||
[[File:Black Ice Battle | [[File:Black Ice Battle DKC2 Klampons and Neeks.png|thumb|Diddy and Dixie standing around Neeks and Klampons]] | ||
To begin the level, the Kongs must hop over a Zinger and slide down an icy slope. They will come up to a gap at the end, and they should drop down into it to reach the floor below. Here, there will be several Klampons charging at them, although the foes can be easily defeated with a simple jump. The heroes must make their way down to the next floor, where they will have to dodge a few Zingers, as well as a Spiny walking along the path. Soon, they will meet up with yet another abyss. Without touching the Zinger flying by, the monkeys must fall through it and jump over a pair of Zingers to reach the next gap. Once they make their way through here, they will have to travel up and down steep slopes. Klampons are also walking across the ice. Players should must make it to another gap and drop down to the next floor. At this point, the monkeys will need to slide down one long and steep slope, while hopping over dangerous Zingers in their path. If they are able to avoid the pests without sliding into them, the heroes must then jump between two Zingers into another gap. Once through the gap, they will be perched on the next floor, and they should walk to the left and fall through another small gap. It won't take them too far downwards, and a Krook will be throwing one of his hooks as they land. The Kongs must escape the foe, and walk right into another abyss. They will land on a slope and slide into another villainous Krook. It must be avoided at all costs. After getting away from the foe, the heroes can drop down into another gap and get to the next floor. Here, they will have to jump over a pair of Zingers and come up to another gap. Dropping down will make them end up in an area filled with several large platforms. They must fall through a crack between the platforms and dodge a few Zingers, until they find another gap. This one will take them directly to the [[Star Barrel]] when jumped through. | To begin the level, the Kongs must hop over a Zinger and slide down an icy slope. They will come up to a gap at the end, and they should drop down into it to reach the floor below. Here, there will be several Klampons charging at them, although the foes can be easily defeated with a simple jump. The heroes must make their way down to the next floor, where they will have to dodge a few Zingers, as well as a Spiny walking along the path. Soon, they will meet up with yet another abyss. Without touching the Zinger flying by, the monkeys must fall through it and jump over a pair of Zingers to reach the next gap. Once they make their way through here, they will have to travel up and down steep slopes. Klampons are also walking across the ice. Players should must make it to another gap and drop down to the next floor. At this point, the monkeys will need to slide down one long and steep slope, while hopping over dangerous Zingers in their path. If they are able to avoid the pests without sliding into them, the heroes must then jump between two Zingers into another gap. Once through the gap, they will be perched on the next floor, and they should walk to the left and fall through another small gap. It won't take them too far downwards, and a Krook will be throwing one of his hooks as they land. The Kongs must escape the foe, and walk right into another abyss. They will land on a slope and slide into another villainous Krook. It must be avoided at all costs. After getting away from the foe, the heroes can drop down into another gap and get to the next floor. Here, they will have to jump over a pair of Zingers and come up to another gap. Dropping down will make them end up in an area filled with several large platforms. They must fall through a crack between the platforms and dodge a few Zingers, until they find another gap. This one will take them directly to the [[Star Barrel]] when jumped through. | ||
From this point, the pair will end up at a fork-in-the-road; they can take either way and fall through a gap. Soon, the monkeys will end up at the meeting point of the two directions and have to drop down through yet another abyss. This time, they will land in an area filled with dozens of small platforms. Each one has a foe on them, who must be avoided at all costs. The heroes should sneak between the cracks of the platforms and jump over a few Zingers to reveal another gap in their path. Dropping down into this will take them to the lower floor. Here, they must jump over a few small alcoves, all containing Zingers. If they can get through this area, they will have to drop down into another gap and land on a steep slope. Without hitting nearby Klampons, the monkeys must continue to descend through the cave and drop to an even lower floor. They will come up to a few short floors, and have to slide down some slopes while dodging some sharp Spinies. Soon, they will make it to a longer area. However, there are a few steep slopes that are shaped in a triangle-like form, with Zingers perched on top of them. This makes the foes much harder to jump over than usual. The Kongs must time their jumps well, and hope to reach another gap, which they should hop through. Once they drop down through here, they will have to jump over more Zinger-filled alcoves and fall down still another abyss. It will take them to the bottom floor, where the heroes must hop up a platforms to get over a mound of ice. They | From this point, the pair will end up at a fork-in-the-road; they can take either way and fall through a gap. Soon, the monkeys will end up at the meeting point of the two directions and have to drop down through yet another abyss. This time, they will land in an area filled with dozens of small platforms. Each one has a foe on them, who must be avoided at all costs. The heroes should sneak between the cracks of the platforms and jump over a few Zingers to reveal another gap in their path. Dropping down into this will take them to the lower floor. Here, they must jump over a few small alcoves, all containing Zingers. If they can get through this area, they will have to drop down into another gap and land on a steep slope. Without hitting nearby Klampons, the monkeys must continue to descend through the cave and drop to an even lower floor. They will come up to a few short floors, and have to slide down some slopes while dodging some sharp Spinies. Soon, they will make it to a longer area. However, there are a few steep slopes that are shaped in a triangle-like form, with Zingers perched on top of them. This makes the foes much harder to jump over than usual. The Kongs must time their jumps well, and hope to reach another gap, which they should hop through. Once they drop down through here, they will have to jump over more Zinger-filled alcoves and fall down still another abyss. It will take them to the bottom floor, where the heroes must hop up a platforms to get over a mound of ice. They can find the [[End of Level Target]], which has either a Banana Bunch, Banana Coin, or Extra Life Balloon. | ||
==Enemies== | ==Enemies== | ||
{| class="dktable-brown" | |||
!Enemy | |||
!Count | |||
|- | |||
|align=center|[[File:Flitter DKC2.png]]<br>[[Flitter]] | |||
|1 | |||
|- | |||
|align=center|[[File:Klampon DKC2.png]]<br>[[Klampon]] | |||
|11 | |||
|- | |||
|align=center|[[File:Klobber DKC2 yellow.png]] [[File:Klobber DKC2 gray.png]]<br>[[Klobber]] | |||
|3 (yellow)<br>3 (black)<br>'''Total:''' 6 | |||
|- | |||
|align=center|[[File:Krook DKC2.png]]<br>[[Krook]] | |||
|3 | |||
|- | |||
|align=center|[[File:Neek DKC2.png]]<br>[[Neek]] | |||
|6 | |||
|- | |||
|align=center|[[File:Spiny DKC2.png]]<br>[[Spiny (Donkey Kong Country 2: Diddy's Kong Quest)|Spiny]] | |||
|4 | |||
|- | |||
|align=center|[[File:Zinger DKC2 yellow.png]][[File:Zinger DKC2 red.png]]<br>[[Zinger]] | |||
|48 (yellow; 6 more in the Bonus Level)<br>1 (red)<br>'''Total:''' 55 | |||
|} | |||
==Items and objects== | |||
{{more images|K-O-N-G Letter locations & Bonus Level}} | |||
{|class="dktable-brown" width=15% | |||
|- | |||
!Sprite | |||
!Name | |||
!Count | |||
|- | |||
|[[File:Banana Bunch DKC SNES.png]] | |||
|[[Banana Bunch]] | |||
|3 | |||
|- | |||
|[[File:Banana Coin.png]] | |||
|[[Banana Coin]] | |||
|1 | |||
|- | |||
|[[File:DK Barrel.png]] | |||
|[[DK Barrel]] | |||
|3 | |||
|- | |||
|[[File:Red Extra Life Balloon DKC2.png]] | |||
|[[Extra Life Balloon]] | |||
|2 | |||
|} | |||
===K-O-N-G Letters=== | |||
{|class="dktable-brown" width=70% | |||
|- | |||
!Letter | |||
!Location | |||
|- | |||
| align="center" |[[File:Black Ice Battle-K.png]] | |||
|In the air past the first Red Zinger encountered. | |||
|- | |||
| align="center" |[[File:Black Ice Battle-O.png]] | |||
| Above a Zinger above the Star Barrel | |||
|- | |||
| align="center" |[[File:Letter N.png]] | |||
|In the portion of the level with several Neeks and Klampons, the "N" is found by sticking to the right and proceeding downward. | |||
|- | |||
| align="center" |[[File:Letter G.png]] | |||
|Between two Zingers that are defeated via Kannonball, on the path to the Bonus Level. | |||
|} | |||
==Secrets== | ==Secrets== | ||
===Bonus Level | [[File:Black Ice Battle DKC2 Bonus Level location.png|thumb|Diddy carrying a kannonball to the Kannon, which leads him to the Bonus Level]] | ||
===Bonus Level=== | |||
{|class="dktable-brown" width=70% | |||
|- | |||
!Image | |||
!Type and description | |||
|- | |||
| | |||
|'''Find the Token!'''<br>After the letter N, the Kongs must continue onward, past some Zingers, and fall down the gap. As they fall, Diddy and Dixie must keep to the right to land into an alcove. The Kongs must pass a yellow Klobber and two Zingers, pick up the [[Treasure Chest]], and hit it into an enemy to reveal the [[kannonball]]. With the kannonball, Diddy and Dixie must continue traveling down the level. When they encounter three Klampons, the Kongs must drop into a few bananas and land below onto a platform. They must continue moving to the right, defeating three Zingers while holding out the kannonball, and land into the kannon. | |||
=== | In the [[Bonus Level]], the Kongs have 20 seconds to carefully travel down three icy slopes while avoiding some Zingers and then collect the [[DK Coin]] at the end. | ||
[[File:Black Ice Battle | |} | ||
===Collectibles=== | |||
{|class="dktable-brown" width=70% | |||
|- | |||
!Item | |||
!Location | |||
|- | |||
| align="center" | [[File:Black Ice Battle Golden Feather.png]]<br>[[Golden Feather]] (GBA version) | |||
|After hitting the Star Barrel, Diddy and Dixie end up at a fork-in-the-road. They must go down the gap to their right and lean against the left wall to land into a gap with the Golden Feather. | |||
|- | |||
| align="center" | [[File:Photograph DKC2GBA sprite.png]]<br>[[Photograph]] (GBA version) | |||
|Shortly after the Star Barrel, the Kongs enter a large area with small icy platforms, each one having either a Klampon or a Neek on it. One of the Klampons has a photograph icon floating over its head. By defeating it, the Kongs obtain a photograph of Klampon for the second page of the [[Scrapbook]]. | |||
|} | |||
=== | ==Gallery== | ||
===Super Nintendo Entertainment System=== | |||
<gallery> | |||
Black Ice Battle DKC2 Zingers.png|Dixie about to jump between two Zingers | |||
</gallery> | |||
=== | ===Game Boy Advance=== | ||
<gallery> | |||
Black Ice Battle GBA Klampons.png|The Kongs jumping at two Klampons | |||
Black Ice Battle GBA Spiny.png|The Kongs traveling down a ledge, with a Spiny in the path beneath them | |||
</gallery> | |||
==Names in other languages== | ==Names in other languages== | ||
Revision as of 17:34, August 12, 2019
Template:Levelbox Black Ice Battle is the second level of the Lost World in Donkey Kong Country 2: Diddy's Kong Quest. It can be accessed via the Klubba's Kiosk of Krem Quay.
Summary
In the level, Diddy Kong and Dixie Kong must descend down an icy cavern, and the ground slippery and made of ice. Due to the icy floor, the Kongs have limited traction, so the player must carefully move them around the area. In the level, the Kongs often have to jump between icy slopes or jump onto the next platform below them. There are many Zingers in the level, most of whom appear within the gaps or around them. Other enemies include Klampons, Klobbers, Krooks, Flitters, Neeks, and Spinies.
In the Game Boy Advance version, the level has a light green background.
Layout


To begin the level, the Kongs must hop over a Zinger and slide down an icy slope. They will come up to a gap at the end, and they should drop down into it to reach the floor below. Here, there will be several Klampons charging at them, although the foes can be easily defeated with a simple jump. The heroes must make their way down to the next floor, where they will have to dodge a few Zingers, as well as a Spiny walking along the path. Soon, they will meet up with yet another abyss. Without touching the Zinger flying by, the monkeys must fall through it and jump over a pair of Zingers to reach the next gap. Once they make their way through here, they will have to travel up and down steep slopes. Klampons are also walking across the ice. Players should must make it to another gap and drop down to the next floor. At this point, the monkeys will need to slide down one long and steep slope, while hopping over dangerous Zingers in their path. If they are able to avoid the pests without sliding into them, the heroes must then jump between two Zingers into another gap. Once through the gap, they will be perched on the next floor, and they should walk to the left and fall through another small gap. It won't take them too far downwards, and a Krook will be throwing one of his hooks as they land. The Kongs must escape the foe, and walk right into another abyss. They will land on a slope and slide into another villainous Krook. It must be avoided at all costs. After getting away from the foe, the heroes can drop down into another gap and get to the next floor. Here, they will have to jump over a pair of Zingers and come up to another gap. Dropping down will make them end up in an area filled with several large platforms. They must fall through a crack between the platforms and dodge a few Zingers, until they find another gap. This one will take them directly to the Star Barrel when jumped through.
From this point, the pair will end up at a fork-in-the-road; they can take either way and fall through a gap. Soon, the monkeys will end up at the meeting point of the two directions and have to drop down through yet another abyss. This time, they will land in an area filled with dozens of small platforms. Each one has a foe on them, who must be avoided at all costs. The heroes should sneak between the cracks of the platforms and jump over a few Zingers to reveal another gap in their path. Dropping down into this will take them to the lower floor. Here, they must jump over a few small alcoves, all containing Zingers. If they can get through this area, they will have to drop down into another gap and land on a steep slope. Without hitting nearby Klampons, the monkeys must continue to descend through the cave and drop to an even lower floor. They will come up to a few short floors, and have to slide down some slopes while dodging some sharp Spinies. Soon, they will make it to a longer area. However, there are a few steep slopes that are shaped in a triangle-like form, with Zingers perched on top of them. This makes the foes much harder to jump over than usual. The Kongs must time their jumps well, and hope to reach another gap, which they should hop through. Once they drop down through here, they will have to jump over more Zinger-filled alcoves and fall down still another abyss. It will take them to the bottom floor, where the heroes must hop up a platforms to get over a mound of ice. They can find the End of Level Target, which has either a Banana Bunch, Banana Coin, or Extra Life Balloon.
Enemies
| Enemy | Count |
|---|---|
Flitter |
1 |
Klampon |
11 |
Klobber |
3 (yellow) 3 (black) Total: 6 |
Krook |
3 |
Neek |
6 |
Spiny |
4 |
Zinger |
48 (yellow; 6 more in the Bonus Level) 1 (red) Total: 55 |
Items and objects
It has been requested that more images be uploaded for this article. Remove this notice only after the additional image(s) have been added. Reason: K-O-N-G Letter locations & Bonus Level
| Sprite | Name | Count |
|---|---|---|
| Banana Bunch | 3 | |
| Banana Coin | 1 | |
| DK Barrel | 3 | |
| Extra Life Balloon | 2 |
K-O-N-G Letters
| Letter | Location |
|---|---|

|
In the air past the first Red Zinger encountered. |

|
Above a Zinger above the Star Barrel |
| In the portion of the level with several Neeks and Klampons, the "N" is found by sticking to the right and proceeding downward. | |
| Between two Zingers that are defeated via Kannonball, on the path to the Bonus Level. |
Secrets

Bonus Level
| Image | Type and description |
|---|---|
| Find the Token! After the letter N, the Kongs must continue onward, past some Zingers, and fall down the gap. As they fall, Diddy and Dixie must keep to the right to land into an alcove. The Kongs must pass a yellow Klobber and two Zingers, pick up the Treasure Chest, and hit it into an enemy to reveal the kannonball. With the kannonball, Diddy and Dixie must continue traveling down the level. When they encounter three Klampons, the Kongs must drop into a few bananas and land below onto a platform. They must continue moving to the right, defeating three Zingers while holding out the kannonball, and land into the kannon. In the Bonus Level, the Kongs have 20 seconds to carefully travel down three icy slopes while avoiding some Zingers and then collect the DK Coin at the end. |
Collectibles
| Item | Location |
|---|---|
 Golden Feather (GBA version) |
After hitting the Star Barrel, Diddy and Dixie end up at a fork-in-the-road. They must go down the gap to their right and lean against the left wall to land into a gap with the Golden Feather. |
Photograph (GBA version) |
Shortly after the Star Barrel, the Kongs enter a large area with small icy platforms, each one having either a Klampon or a Neek on it. One of the Klampons has a photograph icon floating over its head. By defeating it, the Kongs obtain a photograph of Klampon for the second page of the Scrapbook. |
Gallery
Super Nintendo Entertainment System
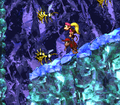
Dixie about to jump between two Zingers

Game Boy Advance
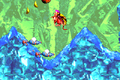
The Kongs jumping at two Klampons
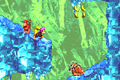
The Kongs traveling down a ledge, with a Spiny in the path beneath them


Names in other languages
| Language | Name | Meaning |
|---|---|---|
| Japanese | アイスドーム タンゴ Aisu Dōmu Tango |
Ice Dome Tango |
| German | Schwarze Eisebene |
Black Ice Level |
| Spanish | Pelea en el Hielo |
Battle in the Ice |