Lockjaw's Locker (Donkey Kong Country 2: Diddy's Kong Quest): Difference between revisions
No edit summary |
(cleaning a mess) |
||
| Line 14: | Line 14: | ||
This is the first underwater level of the game, which takes place in the ship's flooded cargo hold. Similar to [[Coral Capers]] of the original ''[[Donkey Kong Country]]'', the [[Kong]]s can discover [[Enguarde the Swordfish|Enguarde]] (in two separate areas), as well as the aquatic foes, [[Flotsam]]s, [[Lockjaw]]s, and [[Shuri]]s. [[Klomp]]s also appear in areas above the water. Enguarde can be useful to [[Diddy Kong]] and [[Dixie Kong]] throughout this level, as he is needed to enter a [[Bonus Level]], and because he can take out enemies. | This is the first underwater level of the game, which takes place in the ship's flooded cargo hold. Similar to [[Coral Capers]] of the original ''[[Donkey Kong Country]]'', the [[Kong]]s can discover [[Enguarde the Swordfish|Enguarde]] (in two separate areas), as well as the aquatic foes, [[Flotsam]]s, [[Lockjaw]]s, and [[Shuri]]s. [[Klomp]]s also appear in areas above the water. Enguarde can be useful to [[Diddy Kong]] and [[Dixie Kong]] throughout this level, as he is needed to enter a [[Bonus Level]], and because he can take out enemies. | ||
== | ==Layout== | ||
[[File:LockjawsLockerSNES2.png|thumb|left|Dixie Kong falls between the crates at the beginning of the level]] | [[File:LockjawsLockerSNES2.png|thumb|left|Dixie Kong falls between the crates at the beginning of the level]] | ||
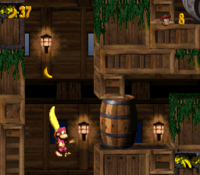
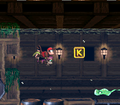
When the Kongs begin the level, they find themselves falling downwards between many large crates and barrels in the ship's cargo hold. As they fall, they come up to a long, curvy trail of bananas, until they eventually land on some solid crates that they can walk along. If they press to the right against the wall as they fall, they can also access a hidden passage containing two [[Banana Coin]]s and a [[Banana Bunch]]. Once the Kongs reach the ground area, they can find a Klomp ahead of them, who walks near an alcove full of water and some bananas. On the other side of the alcove, they can find a [[DK Barrel]] and two Klomps that march on a crate and a treasure chest full of banana peels. A wider alcove full of water is ahead of here with the [[K-O-N-G Letters|letter K]] and a Flotsam above it. A Banana Bunch also hovers over the water. Once they cross the alcove, the water begins to rise, allowing them to travel upwards over a higher piece of sunken luggage. As they swim through this area, they come past a few Flotsams and a Lockjaw, who are followed by a line of bananas and another DK Barrel. | When the Kongs begin the level, they find themselves falling downwards between many large crates and barrels in the ship's cargo hold. As they fall, they come up to a long, curvy trail of bananas, until they eventually land on some solid crates that they can walk along. If they press to the right against the wall as they fall, they can also access a hidden passage containing two [[Banana Coin]]s and a [[Banana Bunch]]. Once the Kongs reach the ground area, they can find a Klomp ahead of them, who walks near an alcove full of water and some bananas. On the other side of the alcove, they can find a [[DK Barrel]] and two Klomps that march on a crate and a treasure chest full of banana peels. A wider alcove full of water is ahead of here with the [[K-O-N-G Letters|letter K]] and a Flotsam above it. A Banana Bunch also hovers over the water. Once they cross the alcove, the water begins to rise, allowing them to travel upwards over a higher piece of sunken luggage. As they swim through this area, they come past a few Flotsams and a Lockjaw, who are followed by a line of bananas and another DK Barrel. | ||
| Line 43: | Line 43: | ||
|} | |} | ||
==Items== | ==Items and objects== | ||
{|class="dktable-brown" width= | {|class="dktable-brown" width=15% | ||
|- | |- | ||
!Sprite | !Sprite | ||
| Line 57: | Line 57: | ||
|[[DK Barrel]] | |[[DK Barrel]] | ||
|4 | |4 | ||
|} | |||
==Secrets== | |||
===Bonus Area=== | |||
{|class="dktable-brown" width=70% | |||
|- | |||
!Image | |||
!Type and description | |||
|- | |||
| align="center" | [[File:LockjawsLockerSNES3.png]] | |||
| '''Find the Token!'''<br>To get to the first and only Bonus Level, Diddy and Dixie must have Enguarde with them. Above the room where they find the swordfish, they should feel around the crates at the top of the area to find a small crate that they can go through. Once they pass through it, they can find some [[banana]]s in the shape of the letter A, as well as a crate sticking out out the side of the room with a lone banana next to it. Using Enguarde's special move, they can break the crate open and enter the Bonus Level. Here, the group must travel through a small maze in order to find a [[Kremkoin]]. If they grab the coin within the time limit of 40 seconds, they complete the Bonus Level successfully. | |||
|} | |||
===Collectibles=== | |||
[[File:LockjawsLockerSNES5.png|thumb|The DK Coin]] | |||
{|class="dktable-brown" width=70% | |||
|- | |||
!Item | |||
!Location | |||
|- | |- | ||
|[[File: | | align="center" | [[File:DK Coin sprite.png]]<br>[[DK Coin]] | ||
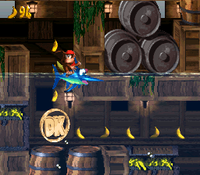
|To find the DK Coin, the Kongs must travel near the end of the level, where the water drains. When this happens, they must keep swimming east and get on some crates and barrels. As they make their way along the objects, they come up the DK Coin, which is located under a trail of bananas. | |||
| | |||
|- | |- | ||
|[[File:Golden Feather DKC2 GBA.png]] | | align="center" | [[File:Golden Feather DKC2 GBA.png]]<br>[[Golden Feather]] (GBA version) | ||
| To find the [[Golden Feather]], the Kongs must travel to the second No Animal Sign, which is located near the end of the level. From the sign, they must travel west until they find themselves going through some crates. After swimming through one large crate, they must jump upwards through a smaller crate to reach a small, enclosed area with the feather in it. | |||
|To find the [[Golden Feather]], the Kongs must travel to the second No Animal Sign, which is located near the end of the level. From the sign, they must travel west until they find themselves going through some crates. After swimming through one large crate, they must jump upwards through a smaller crate to reach a small, enclosed area with the feather in it. | |||
|- | |- | ||
|[[File:Photograph DKC2GBA sprite.png]] | | align="center" | [[File:Photograph DKC2GBA sprite.png]]<br>[[Photograph]] (GBA version) | ||
|With Enguarde, the heroes must head up to the final No Animal Sign in the level. Without passing it, they should head left and swim through some crates at the leftmost side of the room to find a Flotsam. If they defeat it, they are given the level's [[photograph]]. It can be used to give the Kongs a picture of a Flotsam for the fourth page of their [[Scrapbook]]. | |With Enguarde, the heroes must head up to the final No Animal Sign in the level. Without passing it, they should head left and swim through some crates at the leftmost side of the room to find a Flotsam. If they defeat it, they are given the level's [[photograph]]. It can be used to give the Kongs a picture of a Flotsam for the fourth page of their [[Scrapbook]]. | ||
|} | |} | ||
===K-O-N-G Letters=== | ===K-O-N-G Letters=== | ||
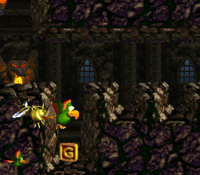
[[File:Toxic Tower DKC2 shot 3.png|thumb|Squawks lowers himself to the letter G.]] | |||
{|class="dktable-brown" width=70% | {|class="dktable-brown" width=70% | ||
|- | |- | ||
| Line 80: | Line 98: | ||
|- | |- | ||
| align="center" |[[File:Letter O.png]] | | align="center" |[[File:Letter O.png]] | ||
|After the Kongs pass the second DK Barrel in the level, they can find an hidden alcove that contains the letter O under a Lockjaw. | | After the Kongs pass the second DK Barrel in the level, they can find an hidden alcove that contains the letter O under a Lockjaw. | ||
|- | |- | ||
| align="center" |[[File:Letter N.png]] | | align="center" |[[File:Letter N.png]] | ||
| Line 88: | Line 106: | ||
|Near the end of the level, the group enters an area full of Lockjaws. The letter G is located in an alcove above the first Lockjaw here. | |Near the end of the level, the group enters an area full of Lockjaws. The letter G is located in an alcove above the first Lockjaw here. | ||
|} | |} | ||
===Warp Barrel=== | |||
=== | |||
{|class="dktable-brown" width=70% | {|class="dktable-brown" width=70% | ||
|- | |- | ||
| Line 99: | Line 113: | ||
!Location | !Location | ||
|- | |- | ||
|[[File:Warp Barrel sprite GBA.png]]<br>[[Warp Barrel]] | |||
| | |Near the beginning of the level, a [[Warp Barrel]] is located in a small alcove next to the location of a Banana Bunch and two Banana Coins. If the Kongs are to go backwards after the water rises, they should feel along the top of the area. One of the alcoves in the ceiling contains an invisible Warp Barrel, which appears after they swim into its located. The barrel takes them to a small area with bananas in the shape of an exclamation mark. Afterward, the Kongs can leave the area and land near the exit of the level. | ||
|} | |} | ||
==Gallery== | ==Gallery== | ||
<gallery> | <gallery> | ||
LockjawsLocker-SNES-K.png|The letter K | |||
LockjawsLockerSNES4.png|Diddy Kong attacks some [[Kremling]]s | LockjawsLockerSNES4.png|Diddy Kong attacks some [[Kremling]]s | ||
LockjawsLocker-GBA-N.png|The letter N | |||
Lockjaws Locker DKC2 GBA.png|The Kongs travel through the Game Boy Advance version of the level | Lockjaws Locker DKC2 GBA.png|The Kongs travel through the Game Boy Advance version of the level | ||
</gallery> | </gallery> | ||
Revision as of 13:12, May 21, 2019
Template:Levelbox Lockjaw's Locker is the fourth level in the game, Donkey Kong Country 2: Diddy's Kong Quest. It is located within the Gangplank Galleon.
This is the first underwater level of the game, which takes place in the ship's flooded cargo hold. Similar to Coral Capers of the original Donkey Kong Country, the Kongs can discover Enguarde (in two separate areas), as well as the aquatic foes, Flotsams, Lockjaws, and Shuris. Klomps also appear in areas above the water. Enguarde can be useful to Diddy Kong and Dixie Kong throughout this level, as he is needed to enter a Bonus Level, and because he can take out enemies.
Layout
When the Kongs begin the level, they find themselves falling downwards between many large crates and barrels in the ship's cargo hold. As they fall, they come up to a long, curvy trail of bananas, until they eventually land on some solid crates that they can walk along. If they press to the right against the wall as they fall, they can also access a hidden passage containing two Banana Coins and a Banana Bunch. Once the Kongs reach the ground area, they can find a Klomp ahead of them, who walks near an alcove full of water and some bananas. On the other side of the alcove, they can find a DK Barrel and two Klomps that march on a crate and a treasure chest full of banana peels. A wider alcove full of water is ahead of here with the letter K and a Flotsam above it. A Banana Bunch also hovers over the water. Once they cross the alcove, the water begins to rise, allowing them to travel upwards over a higher piece of sunken luggage. As they swim through this area, they come past a few Flotsams and a Lockjaw, who are followed by a line of bananas and another DK Barrel.
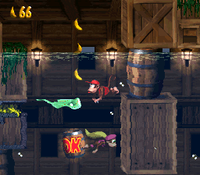
A hidden passage between some crates is also in this area, and it contains a long trail of bananas and two Banana Coins. There is another hidden passage under a crate found below the aforementioned DK Barrel, and if the primates swim through it, they can find a room containing an Animal Crate with Enguarde inside of it. An additional area is above the DK Barrel as well that contains a group of bananas that form the letter A and the entrance to a Bonus Level. If the primates travel forward from the DK Barrel, they come up to some more Flotsams and another Lockjaw, whom the letter O can be found under amongst some bananas in an alcove. After they pass this foe, they find a pathway leading upwards past a few Flotsams that swim in a horizontal path across the area. At the top this pathway, the water begins to lower. A No Animal Sign sits on some of the luggage to the left of here, and the primates can only get Enguarde over to it if they swim towards it before the water becomes too shallow. Otherwise, they have to dismount from the helper and continue past the sign on foot. If they manage to reach the sign with the swordfish, the helper disappears and they are given a red Extra Life Balloon. An area full of water follows the sign, and if the Kongs swim to the bottom of it, they can find a Star Barrel.
After the two friends pass the Star Barrel, they find a passage leading upwards past a DK Barrel and a Flotsam. As they continue past the Flotsam, the water begins to rise again, allowing them to travel higher into a wide area with the letter N in the corner of it. If they head west from the letter N, they come past a Shuri and then past a few Flotsams. Another Shuri follows these enemies, and if the primates feel along the ground below it, they can find a hidden passage on the other side of the crates that contains many bananas and two Banana Coins. A room containing another Animal Crate with Enguarde is at the end of this passage, along with a single Lockjaw. If the heroes head north from the aforementioned Shuri, they come up to a trail of bananas and past a few Flotsams to reach a wide area full of Lockjaws. An alcove is above the first Lockjaw that contains several bananas and the letter G.
In a lower part of the area, they can also find more bananas and a Banana Coin in some alcoves. Once the heroes travel past all of the Lockjaws, they come through a wide passage containing a few Shuris and then access a large area, where the water begins to lower. They can find a hidden area above some crates containing many bananas and a DK Coin if they quickly travel to the east before the water lowers too much. If they do not reach this section of the level, the water lowers them down to a passage that contains a few Flotsams. After passing the foes, the group reaches a No Animal Sign on top of some large barrels. If the sign is reached with Enguarde, who disappears before passing it, they are given a Banana Bunch. An End of Level Target is ahead of here, and the Kongs successfully complete the level when it is hit. If they shoot to the target from a nearby Barrel Cannon, they win a prize after completing the level.
Enemies
| Enemy | Count |
|---|---|
Klomp |
3 |
Flotsam |
15 (5 green, 10 blue) |
Lockjaw |
6 |
Shuri |
4 |
Items and objects
| Sprite | Name | Count |
|---|---|---|
| Banana Coin | 6 | |
| DK Barrel | 4 |
Secrets
Bonus Area
| Image | Type and description |
|---|---|
|
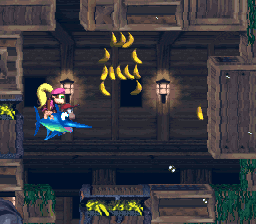
Find the Token! To get to the first and only Bonus Level, Diddy and Dixie must have Enguarde with them. Above the room where they find the swordfish, they should feel around the crates at the top of the area to find a small crate that they can go through. Once they pass through it, they can find some bananas in the shape of the letter A, as well as a crate sticking out out the side of the room with a lone banana next to it. Using Enguarde's special move, they can break the crate open and enter the Bonus Level. Here, the group must travel through a small maze in order to find a Kremkoin. If they grab the coin within the time limit of 40 seconds, they complete the Bonus Level successfully. |
Collectibles
| Item | Location |
|---|---|
DK Coin |
To find the DK Coin, the Kongs must travel near the end of the level, where the water drains. When this happens, they must keep swimming east and get on some crates and barrels. As they make their way along the objects, they come up the DK Coin, which is located under a trail of bananas. |
Golden Feather (GBA version) |
To find the Golden Feather, the Kongs must travel to the second No Animal Sign, which is located near the end of the level. From the sign, they must travel west until they find themselves going through some crates. After swimming through one large crate, they must jump upwards through a smaller crate to reach a small, enclosed area with the feather in it. |
Photograph (GBA version) |
With Enguarde, the heroes must head up to the final No Animal Sign in the level. Without passing it, they should head left and swim through some crates at the leftmost side of the room to find a Flotsam. If they defeat it, they are given the level's photograph. It can be used to give the Kongs a picture of a Flotsam for the fourth page of their Scrapbook. |
K-O-N-G Letters
Warp Barrel
| Sprite | Location |
|---|---|
Warp Barrel |
Near the beginning of the level, a Warp Barrel is located in a small alcove next to the location of a Banana Bunch and two Banana Coins. If the Kongs are to go backwards after the water rises, they should feel along the top of the area. One of the alcoves in the ceiling contains an invisible Warp Barrel, which appears after they swim into its located. The barrel takes them to a small area with bananas in the shape of an exclamation mark. Afterward, the Kongs can leave the area and land near the exit of the level. |
Gallery
Diddy Kong attacks some Kremlings
Names in other languages
| Language | Name | Meaning |
|---|---|---|
| Japanese | 船ぞこダイビング Funazoko daibingu |
Bottomship Diving |
| German | Sinkender Holländer (SNES) Lockjaws Revier (GBA) |
Sinking Dutchman (reference to the Flying Dutchman) Lockjaw's Territory |
| Italian | Stiva a Mollo |
Soaked Ship Cellar |
| Spanish | Sala del Trismo |
Lockjaw's Chamber |
