Redhot Ride: Difference between revisions
m (Just wanted to point out that Diddy can also reach the hot air balloon near the bonus level here.) |
(merged this too) |
||
| Line 1: | Line 1: | ||
{{Levelbox | {{Levelbox | ||
|title=Redhot Ride | |title=Redhot Ride | ||
| Line 10: | Line 9: | ||
|after=[[Squawks's Shaft (Donkey Kong Land 2)|>>]] | |after=[[Squawks's Shaft (Donkey Kong Land 2)|>>]] | ||
}} | }} | ||
'''Redhot Ride''' is the ninth [[level]] of | {{about|the level in ''Donkey Kong Land 2''|the level in ''[[Donkey Kong Country 2: Diddy's Kong Quest]]'' with a similar spelling|[[Red-Hot Ride]]}} | ||
'''Redhot Ride''' is the ninth [[level]] of ''[[Donkey Kong Land 2]]'' and the fourth level in the second world, [[Krem Cauldron]]. | |||
Redhot Ride is the second volcanic level in the game, after [[Hothead Hop]]. The level introduces [[Hot Air Balloon]]s, which slowly descend as [[Diddy Kong]] and [[Dixie Kong]] ride on them. The [[Kong]]s can bounce on some [[Flitter]]s to get across the lava. [[Rambi the Rhino]] appears in a brief part of the level. Later in the level, after the [[No Animal Sign]], the Kongs encounter some [[Zinger]]s in mid-air. | |||
== | ==Layout== | ||
[[File:Redhot Ride DKL2 shot 3.png|thumb|left|160px|Dixie Kong | [[File:Redhot Ride DKL2 shot 3.png|thumb|left|160px|Dixie Kong at a DK Barrel near the start of the level.]] | ||
The level begins on a slanted pathway with a Neek on it. Behind the starting point, the heroes can find a trio of Zingers that guard a [[Treasure Chest|treasure chest]] containing a Banana Coin. If the primates make their way to the top of the slanted pathway, they can find a Klobber and a [[DK Barrel]] near a wide pit with a Hot Air Balloon above it. The balloon can help them cross the pit of lava, which is located under a group of bananas that form the shape of an arrow pointing east. If they follow this arrow and a few other bananas before their balloon falls into the lava, they can reach another area of ground that holds a Klampon, the letter K, and a high piece of ground with a Hot Air Balloon next to it. Once they land on this balloon, it begins to descend. They can use it to hover over a pit and to another balloon, which can then send them to a Zinger with a third balloon next to it. If they manage to jump over the Zinger and land on the balloon, they can make their way over the remaining part of the abyss and reach an section of land that consists of a few ledges with Klobbers on them. | The level begins on a slanted pathway with a Neek on it. Behind the starting point, the heroes can find a trio of Zingers that guard a [[Treasure Chest|treasure chest]] containing a Banana Coin. If the primates make their way to the top of the slanted pathway, they can find a Klobber and a [[DK Barrel]] near a wide pit with a Hot Air Balloon above it. The balloon can help them cross the pit of lava, which is located under a group of bananas that form the shape of an arrow pointing east. If they follow this arrow and a few other bananas before their balloon falls into the lava, they can reach another area of ground that holds a Klampon, the letter K, and a high piece of ground with a Hot Air Balloon next to it. Once they land on this balloon, it begins to descend. They can use it to hover over a pit and to another balloon, which can then send them to a Zinger with a third balloon next to it. If they manage to jump over the Zinger and land on the balloon, they can make their way over the remaining part of the abyss and reach an section of land that consists of a few ledges with Klobbers on them. | ||
At the highest point in this ground area, the Kongs can find an [[Animal Barrel]] that contains Rambi, and if they enter the barrel, they are turned into the rhino. There is another Hot Air Balloon near here that the heroes can ride on to glide through an optional path with a Zinger and another Hot Air Balloon in it. This balloon can send them to another Hot Air Balloon that is located near some Flitters, who the Kongs must bounce on to reach an additional balloon that can lead them to a pair of Zingers that guard the letter O. If the heroes do not take the optional path located immediately after Rambi's Animal Barrel, they must instead drop down to a lower part of the ground area to reach a Kruncha and a slanted pathway that leads to a pit. The Kongs can use a Hot Air Balloon above the abyss to reach another balloon near a Zinger. After they pass this wasp-like enemy, they come up to a Banana Coin and another balloon that can lead them to a Flitter, who they can bounce on to reach a solid, rocky area of land with a few ledges on it. If they climb these ledges, they reach a No Animal Sign that, when passed with Rambi, | At the highest point in this ground area, the Kongs can find an [[Animal Barrel]] that contains Rambi, and if they enter the barrel, they are turned into the rhino. There is another Hot Air Balloon near here that the heroes can ride on to glide through an optional path with a Zinger and another Hot Air Balloon in it. This balloon can send them to another Hot Air Balloon that is located near some Flitters, who the Kongs must bounce on to reach an additional balloon that can lead them to a pair of Zingers that guard the letter O. If the heroes do not take the optional path located immediately after Rambi's Animal Barrel, they must instead drop down to a lower part of the ground area to reach a Kruncha and a slanted pathway that leads to a pit. The Kongs can use a Hot Air Balloon above the abyss to reach another balloon near a Zinger. After they pass this wasp-like enemy, they come up to a Banana Coin and another balloon that can lead them to a Flitter, who they can bounce on to reach a solid, rocky area of land with a few ledges on it. If they climb these ledges, they reach a No Animal Sign that, when passed with Rambi, reverts him back to the playable Kong and rewards them with a Banana Coin. The level's Star Barrel is near here on a lower section of land. | ||
A pit with a Hot Air Balloon above it is near here, and the duo must ride along the balloon to reach a second balloon, which is located shortly after a Zinger. This balloon can help them reach an area of land with a DK Barrel above it. A few Flitters hover in a small pit of lava near here, and the primates can bounce on them to cross the pit. On the other side of the pit, they can find a steep hill that they must climb to discover a Hot Air Balloon over a pit. As they cross the abyss with this object, they approach a Zinger and a Flitter with a second balloon to the right of them. If the primates manage to get onto this balloon, they can be led farther into the level above a DK Coin and to another Hot Air Balloon that hovers next to a few Flitters that must be bounced on to cross most of the pit. An additional balloon follows the insects that can be traveled along to reach the letter G and another area of land that holds two Klobbers and a Kruncha, who march under a DK Barrel. Another pit is ahead of here, and two Hot Air Balloons are above it that the Kongs must ride along to reach an [[Extra Life Balloon]] and one final area of ground. As they hover along these balloons, a Flitter tries to impend in their progress. When the heroes reach the final area of ground, they can find a long pathway leading to a spring, which they must bounce on to complete the level successfully. | A pit with a Hot Air Balloon above it is near here, and the duo must ride along the balloon to reach a second balloon, which is located shortly after a Zinger. This balloon can help them reach an area of land with a DK Barrel above it. A few Flitters hover in a small pit of lava near here, and the primates can bounce on them to cross the pit. On the other side of the pit, they can find a steep hill that they must climb to discover a Hot Air Balloon over a pit. As they cross the abyss with this object, they approach a Zinger and a Flitter with a second balloon to the right of them. If the primates manage to get onto this balloon, they can be led farther into the level above a DK Coin and to another Hot Air Balloon that hovers next to a few Flitters that must be bounced on to cross most of the pit. An additional balloon follows the insects that can be traveled along to reach the letter G and another area of land that holds two Klobbers and a Kruncha, who march under a DK Barrel. Another pit is ahead of here, and two Hot Air Balloons are above it that the Kongs must ride along to reach an [[Extra Life Balloon]] and one final area of ground. As they hover along these balloons, a Flitter tries to impend in their progress. When the heroes reach the final area of ground, they can find a long pathway leading to a spring, which they must bounce on to complete the level successfully. | ||
== | ==Enemies== | ||
====K-O-N-G Letters | *[[Flitter]]: 10 | ||
*[[Klampon]]: 1 | |||
*[[Klobber]]: 5 | |||
*[[Krockhead]]: 2 (Bonus Level only) | |||
*[[Kruncha]]: 2 | |||
*[[Neek]]: 1 | |||
*[[Zinger]]: 9 | |||
==Items and objects== | |||
*[[Bear Coin]]: 2 | |||
*[[DK Barrel]]: 3 | |||
*[[Red Balloon]]: 1 | |||
*[[Treasure Chest]]: 1 | |||
===K-O-N-G Letters=== | |||
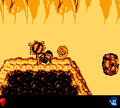
[[File:Redhot Ride DKL2 shot 2.png|thumb|160px|Diddy runs towards the letter K.]] | [[File:Redhot Ride DKL2 shot 2.png|thumb|160px|Diddy runs towards the letter K.]] | ||
*K: After the Kongs cross the first pit of lava, they reach an area of land with the letter K on the end of it. | *K: After the Kongs cross the first pit of lava, they reach an area of land with the letter K on the end of it, right after a Klampon. | ||
*O: | *O: Once the Kongs enter into the Rambi Barrel, Rambi must jump on a Hot Air Balloon, which can hover high up from the steam geysers. After reaching a height, Rambi reaches two Hot Air Balloons which take him to some Flitters, whom he should bounce on to reach another Hot Air Balloon that takes him to a pair of Zingers surrounding the letter O. | ||
*N: | *N: After completing the Bonus Level, Diddy and Dixie are immediately shot out to the letter N. | ||
*G: The letter G is | *G: The letter G is hovering at the end of a lava pit before the final DK Barrel and shortly before the DK Coin. | ||
===DK Coin=== | |||
{|class="dktable-brown" width=70% | |||
|- | |||
!Image | |||
!Type and description | |||
|- | |||
|[[File:Redhot Ride DKL2 DK Coin.png]] | |||
|While traveling over the third pit of lava after the Star Barrel, Diddy and Dixie must go on the second Hot Air Balloon and hover to the right. As they continue, the Kongs must jump below to a lone banana, which leads them to the [[DK Coin]] below. | |||
|} | |||
==Bonus Level== | |||
{|class="dktable-brown" width=70% | |||
|- | |||
!Image | |||
!Type and description | |||
|- | |||
|[[File:Redhot Ride DKL2 Bonus Level.png]] | |||
|'''''Collect the Stars!'''''<br>Shortly after passing the first fire pit past the level's Star Barrel, the Kongs must climb up to a slightly higher piece of ground and jump to the left, using Dixie to hover over some of the lava pit with her ponytail. If she hovers far enough, she can reach a Hot Air Balloon that can carry here farther to the left, where a Bonus Barrel is located. Diddy can also reach the barrel, but he will need to use a well-timed cartwheel jump to reach it. | |||
In the Bonus Level, Diddy and Dixie must collect 20 stars while riding a Hot Air Balloon within 25 seconds. If the balloon falls too far before they collect all of the stars, they can simply use another Hot Air Balloon, as there is an unlimited supply of them in the bonus. The Kongs can alternatively jump across the Krockheads in the lava. After collecting all the stars, a Kremkoin appears on the right side for the Kongs to collect. | |||
|} | |||
==== | ==Gallery== | ||
<gallery> | |||
Redhot Ride DKL2 map.png|Redhot Ride on the world map | |||
Redhot Ride DKL2 start.png|Diddy at the start of Redhot Ride | |||
Redhot Ride DKL2 defeated Zinger.png|Rambi defeats a Zinger | |||
Redhot Ride DKL2 No Animal Sign.png|Diddy at the No Animal Sign | |||
Redhot Ride DKL2 end.png|Diddy approaching the End of Level Target | |||
</gallery> | |||
==Names in other languages== | ==Names in other languages== | ||
Revision as of 23:58, October 3, 2019
- This article is about the level in Donkey Kong Land 2. For the level in Donkey Kong Country 2: Diddy's Kong Quest with a similar spelling, see Red-Hot Ride.
Redhot Ride is the ninth level of Donkey Kong Land 2 and the fourth level in the second world, Krem Cauldron.
Redhot Ride is the second volcanic level in the game, after Hothead Hop. The level introduces Hot Air Balloons, which slowly descend as Diddy Kong and Dixie Kong ride on them. The Kongs can bounce on some Flitters to get across the lava. Rambi the Rhino appears in a brief part of the level. Later in the level, after the No Animal Sign, the Kongs encounter some Zingers in mid-air.
Layout

The level begins on a slanted pathway with a Neek on it. Behind the starting point, the heroes can find a trio of Zingers that guard a treasure chest containing a Banana Coin. If the primates make their way to the top of the slanted pathway, they can find a Klobber and a DK Barrel near a wide pit with a Hot Air Balloon above it. The balloon can help them cross the pit of lava, which is located under a group of bananas that form the shape of an arrow pointing east. If they follow this arrow and a few other bananas before their balloon falls into the lava, they can reach another area of ground that holds a Klampon, the letter K, and a high piece of ground with a Hot Air Balloon next to it. Once they land on this balloon, it begins to descend. They can use it to hover over a pit and to another balloon, which can then send them to a Zinger with a third balloon next to it. If they manage to jump over the Zinger and land on the balloon, they can make their way over the remaining part of the abyss and reach an section of land that consists of a few ledges with Klobbers on them.
At the highest point in this ground area, the Kongs can find an Animal Barrel that contains Rambi, and if they enter the barrel, they are turned into the rhino. There is another Hot Air Balloon near here that the heroes can ride on to glide through an optional path with a Zinger and another Hot Air Balloon in it. This balloon can send them to another Hot Air Balloon that is located near some Flitters, who the Kongs must bounce on to reach an additional balloon that can lead them to a pair of Zingers that guard the letter O. If the heroes do not take the optional path located immediately after Rambi's Animal Barrel, they must instead drop down to a lower part of the ground area to reach a Kruncha and a slanted pathway that leads to a pit. The Kongs can use a Hot Air Balloon above the abyss to reach another balloon near a Zinger. After they pass this wasp-like enemy, they come up to a Banana Coin and another balloon that can lead them to a Flitter, who they can bounce on to reach a solid, rocky area of land with a few ledges on it. If they climb these ledges, they reach a No Animal Sign that, when passed with Rambi, reverts him back to the playable Kong and rewards them with a Banana Coin. The level's Star Barrel is near here on a lower section of land.
A pit with a Hot Air Balloon above it is near here, and the duo must ride along the balloon to reach a second balloon, which is located shortly after a Zinger. This balloon can help them reach an area of land with a DK Barrel above it. A few Flitters hover in a small pit of lava near here, and the primates can bounce on them to cross the pit. On the other side of the pit, they can find a steep hill that they must climb to discover a Hot Air Balloon over a pit. As they cross the abyss with this object, they approach a Zinger and a Flitter with a second balloon to the right of them. If the primates manage to get onto this balloon, they can be led farther into the level above a DK Coin and to another Hot Air Balloon that hovers next to a few Flitters that must be bounced on to cross most of the pit. An additional balloon follows the insects that can be traveled along to reach the letter G and another area of land that holds two Klobbers and a Kruncha, who march under a DK Barrel. Another pit is ahead of here, and two Hot Air Balloons are above it that the Kongs must ride along to reach an Extra Life Balloon and one final area of ground. As they hover along these balloons, a Flitter tries to impend in their progress. When the heroes reach the final area of ground, they can find a long pathway leading to a spring, which they must bounce on to complete the level successfully.
Enemies
Items and objects
- Bear Coin: 2
- DK Barrel: 3
- Red Balloon: 1
- Treasure Chest: 1
K-O-N-G Letters

- K: After the Kongs cross the first pit of lava, they reach an area of land with the letter K on the end of it, right after a Klampon.
- O: Once the Kongs enter into the Rambi Barrel, Rambi must jump on a Hot Air Balloon, which can hover high up from the steam geysers. After reaching a height, Rambi reaches two Hot Air Balloons which take him to some Flitters, whom he should bounce on to reach another Hot Air Balloon that takes him to a pair of Zingers surrounding the letter O.
- N: After completing the Bonus Level, Diddy and Dixie are immediately shot out to the letter N.
- G: The letter G is hovering at the end of a lava pit before the final DK Barrel and shortly before the DK Coin.
DK Coin
| Image | Type and description |
|---|---|

|
While traveling over the third pit of lava after the Star Barrel, Diddy and Dixie must go on the second Hot Air Balloon and hover to the right. As they continue, the Kongs must jump below to a lone banana, which leads them to the DK Coin below. |
Bonus Level
| Image | Type and description |
|---|---|

|
Collect the Stars! Shortly after passing the first fire pit past the level's Star Barrel, the Kongs must climb up to a slightly higher piece of ground and jump to the left, using Dixie to hover over some of the lava pit with her ponytail. If she hovers far enough, she can reach a Hot Air Balloon that can carry here farther to the left, where a Bonus Barrel is located. Diddy can also reach the barrel, but he will need to use a well-timed cartwheel jump to reach it. In the Bonus Level, Diddy and Dixie must collect 20 stars while riding a Hot Air Balloon within 25 seconds. If the balloon falls too far before they collect all of the stars, they can simply use another Hot Air Balloon, as there is an unlimited supply of them in the bonus. The Kongs can alternatively jump across the Krockheads in the lava. After collecting all the stars, a Kremkoin appears on the right side for the Kongs to collect. |
Gallery
Redhot Ride on the world map
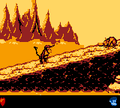
Diddy at the start of Redhot Ride
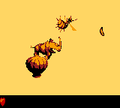
Rambi defeats a Zinger
Diddy at the No Animal Sign
Diddy approaching the End of Level Target


Names in other languages
| Language | Name | Meaning |
|---|---|---|
| Japanese | ねっききゅうライド Nekkikyū Raido |
Hot Balloon Ride |